How to Set up Sapper With cPanel
Ignatius Bagussuputra #tutorial#cPanel#nodejs#pm2#sapper#hostingSetup your Node app with cPanel hosting
Article Index
I don’t think I’ve seen a single post on how to properly set up a Node.js application in a shared or dedicated hosting with cPanel. Especially with what small community Svelte has, I thought I may as well contribute by sharing my experience on setting up a production-ready application bundle.
It’s today I’m finally successful on setting up my Sapper application in my hosting provider. It took me around 5 days and it was such a weird bug to begin with. Anyways, this shouldn’t be bound to a Sapper app and should work with any Node application that is acting as a server.
This tutorial assumes you already have a working application to begin with. If you don't, you can just use the template provided by Sapper at their website -> sapper.svelte.dev
Getting started with cPanel
Let’s get started by first making sure that your hosting provider provides a Node.js development environment and SSH access. You should be able to find it in their pricing and features page they provide. If you can’t find it, either contact the support first or make sure they provide a guaranteed refund so you can buy and test it for yourself first.

You should then be able to find this section in your cPanel page, click on the Setup Node.js App and click on Create Application. You’ll see a form like presented below, fill each one according to your needs and preference.
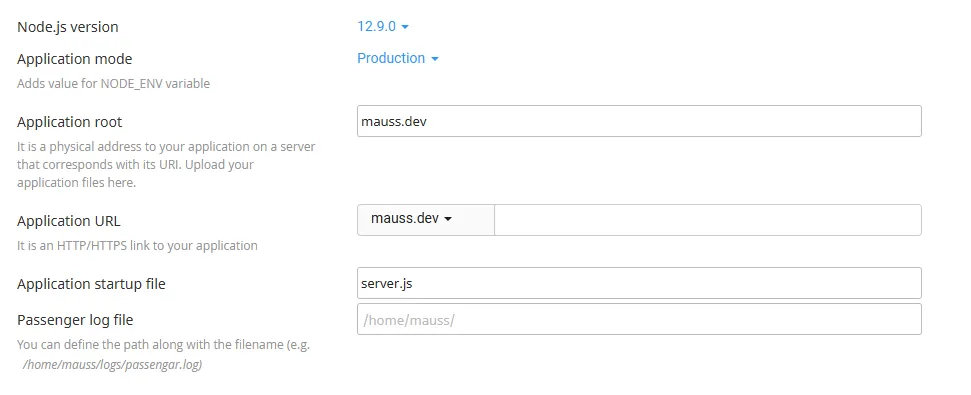
Here’s the explanation for each field,
- Choose your Node version (I use the same as my local dev environment, you can usually just use the latest one)
- Set the application mode to
Production - Set the application root to your preferred folder (I always use the name of the domain I use, in this case just mauss.dev because it’s the root/apex domain)
- Set the application url to your liking
- If you want to use a subdomain, you need to set one up first before creating the Node application
- If you want to set up an API, you can add
apioradminor whatever you want in the text field, this will be you root application URL
- Application startup file can usually be left untouched and it will fill itself as
app.js, but in this case I’ll useserver.jsas my startup file
Getting started with Node.js
After creating your Node application, you’ll be given a command to activate the virtual environment and enter the application root, it will look something like this
source /home/mauss/nodevenv/mauss.dev/12/bin/activate && cd /home/mauss/mauss.dev
Copy that command and SSH to your server. Each hosting provider will be slightly different so contact the support if you’re not sure how. The general command is as follow
# some providers use different ports for SSH, but the default is 22# just change the -p argument to your provided portssh username@domain.com -p 22
After successfully entering the server, paste in the command from the previous block to enter the virtual environment.
Now, there’s really a lot of ways to do this, you’ll need to find the one you prefer by yourself. I just happen to do this with FTP/SCP. You can easily use the file manager from cPanel and upload your files there.
Using any method you know, move or copy the build result of your application to the application root folder, in my case the mauss.dev folder. Sapper build result is located at __sapper__/build, so all we need to do is copy this folder as well as our static folder that contains all our assets like stylesheets and images.
Finally, we’ll copy our package.json file, focus on our SSH terminal, and run
npm install
This will install all our required server dependencies to run it. While waiting for it to finish, create server.js. This is the file we defined as the application startup file when creating our Node application. It should only contain one line that points it to the server index file.
server.js require('__sapper__/build/index.js');
Now, you should be able to run npm start or node server.js and see your application running on your domain. If your app isn’t showing up and you’ve already tried adding :3000 at the end of it, don’t worry, we’ll cover it in the final steps.
Run and maintain Node application
Now that your application is running, you’ll want to keep it running even when you left the SSH. For this, we’ll use pm2, a Node.js daemon process manager. We can use it via the npm global installation or npx.
# global installation and usagenpm i -g pm2 # run once onlypm2 start server.js# via npxnpx pm2 start server.js
If you want more customizability, you can run pm2 init and it will generate a file called ecosystem.config.js that you can customize for you liking. Below is my configuration file
ecosystem.config.js module.exports = {apps : [{name: 'web',script: '__sapper__/build/index.js',watch: false}],};
We can then run pm2 start ecosystem.config.js once, and each time we need to manage it, we’ll only need to call 3 commands. Each of them are self-explanatory with their commands.
pm2 stop webpm2 start webpm2 restart web
Final steps
Now here comes the crucial part, because most hosting providers won’t allow you to connect to a specific port, or I’ll assume all of you want your users to go to your website without adding :3000 to the end of the domain, we’ll need to route the traffic using the built-in Apache proxy server with an .htaccess file located in our public_html folder. You should be able to just copy the configuration below and paste it in yours.
.htaccess RewriteEngine OnRewriteCond %{HTTPS} offRewriteRule ^(.*)$ https://%{HTTP_HOST}%{REQUEST_URI} [L,R=301]RewriteCond %{REQUEST_FILENAME} !-fRewriteCond %{REQUEST_FILENAME} !-dRewriteRule ^(.*)$ http://%{HTTP_HOST}:3000/$1 [P,L]
This configuration will solve all the tedious stuff you don’t want to be messing around with, stuff like having https as the default protocol and proxying the traffic to our Node app port. If you’re setting up other application and does not use port 3000, you can just change that number in the last line to whatever port your application resides in.
And with that, you’re all set up and done! You should now be able to visit your website running your Sapper or Node app.
See something to improve or fix? In the spirit of open-source, you can create a new issue or contribute directly to this article by sending a Pull Request on GitHub!