scattered reflections
thoughts in motion.
Crafting a Minimal SVG-to-Favicon Generator
a technical dive into the process of building a self-contained favicon generator
A Terrible Time to Be a Writer
an effort to try and write something that feels real and honest
Quarter-Life Renaissance
October canon event — a quarter-century reflection
The Dream Laptop for Productivity and Portability
My best dream laptop for working while traveling
Open Letter of Admiration to Ado
Thoughts after the Wish concert on the 27th of February in Jakarta
Git LFS Crash Course
A quick introduction to the basics of Git LFS
ARIA: aria-label vs. title attribute
What's the difference, and which one should you use?
24K Journey - The Pursuit of a Meaningful Life
The 24th year of both introspection and retrospection, a journey towards a meaningful and fulfilling life encompassing happiness and reason for existence.
RIP Google Domains - Exploring New Digital Homes for Our Domains
In the wake of Alphabet shutting down Google Domains, many of us are looking for alternatives to move our domains to, especially for our dev domains
A Serendipitous Stroke of Events
What a delightful year it has been
Prologue to the Beginning of the End
A start to the beginning of the end
Scheduling a Routine - a Disciplinary Process
A take on a disciplinary start at life and in general
CSS Framework Is Wasteful
Do you really need a CSS framework? Here's why I think I don't
Mental Exhaustion Is No Joke
This is probably the lowest point in my life, so far. I managed to survive and get back but at what cost?
One-Hundredth of a Light-Year Across the Milky Way
My journey after more than one-hundredth of a light-year across the Milky Way or over 20 revolutions around the sun
RIP Sapper - Svelte Is Moving to Snowpack
It's been a fun ride using Sapper but all good things must come to an end. Svelte is moving to Snowpack and ditching bundlers
Protect Your Cookies
Learn why you should care about your cookies and how you can protect by securing it
Semantic Commit Message
A practical guide to writing semantic commits
Shallow Water Blackout
What is it and why is it important for you to know this
What Is JWT and Do You Really Need It?
What is a JSON Web Token and do you really need it for your app.
Utilize Modern DevTools
Utilize modern developer tools like formatter and linters to make your life as a developer easier
CORS Crash Course - Client or Server?
A brief yet sufficient explanation for Cross-Origin Resource Sharing (CORS)
How to Set up Sapper With cPanel
Setup your Node app with cPanel hosting
Configure Static Site Hosting with your Custom Domain
Quickly setup your custom domain in just a couple of steps
Secretlab TITAN Chair First Impression
First impression of Secretlab chair TITAN series
Persona from A Hacker's Perspective
Persona should be the first step to any development plan
Admin Dashboard with Svelte and Firebase
Creating a full-fledged admin dashboard in under 3 hours
Complete Flutter Development Automation
Check out how to automate your Flutter development workflow
Importance of Proper Git Usage
A good commit can come a long way in the future and it can significantly reduce debugging time with descriptive body
Test-Driven Development: A Double-Edged Sword
Is TDD really worth the time to invest for a maintainable and clean codebase
Block Internet Access for a Program
block any program from accessing the internet in Windows using firewall rules.
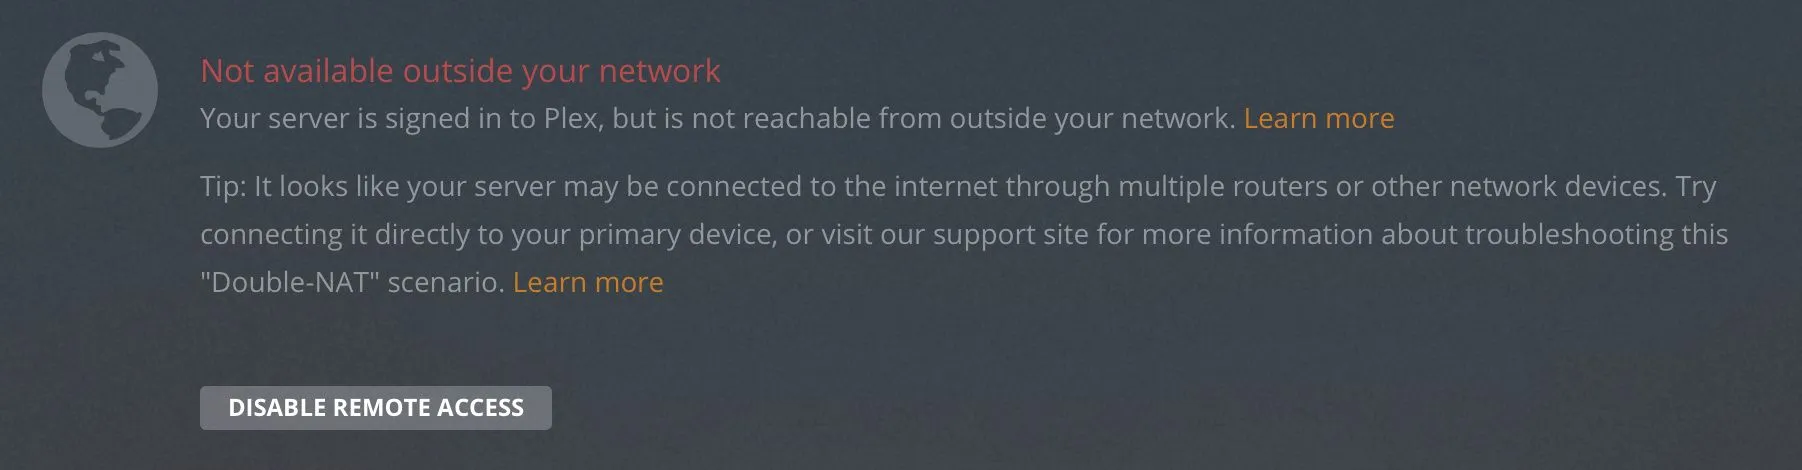
Fix Double-NAT on Your Network
detect and fix Double-NAT issues that break remote access in apps like Plex, using traceroute, bridge mode, and port forwarding.
Use an SD Card as Permanent Storage in Windows
mount an SD card in Windows as permanent storage.
Get the Latest Windows Update Now
ways to install the latest Windows updates immediately.
Set Up Plex Media Server on Raspberry Pi
set up a Plex media server on Raspberry Pi for home streaming.
Django Setup with GitLab and Heroku
create a Django app with GitLab CI/CD and deploy automatically to Heroku.